In poking about audio sites, I discovered Roon Labs Roon music server product. Roon is the music server I’ve been looking for for 20 years. Roon Labs has its origins in the Meridian Audio Solooes product over in the UK. This is a highly regarded embed music server organized in proper client server fashion. This post describes Roon, my Raspberry Pi build of a Roon Transport, and the commissioning process. Though not a step by step (see the references), this post includes some lessons learned during the build and setup, and the bandaging of my knuckles.
Listening Experience
After several weeks of living with Roon and the HiFiBerry Digi+ transport, I’m seriously taken with the product.
- The composer, composition, and performance reviews are of high quality, written in an engaging and informative style.
- Roon Radio is helping me rediscover records and tracks I had forgotten I had. Starting with a Thile-Meyer track, it worked through the album, into Fleck & Meyer, then to Nickel Creek, and Punch brothers and back to Thile-Mehldau. Poor dogs had to listen to acid grass and acid folk while I was shopping.
- The Digi+ kit just works with the metal case and HiFiBerry standard power supply. There’s no need for expensive linear supplies or unobtainium wire cryogenically aged in unicorn blood. The DAC is going to jitter buffer, retime, and reformat for rendering and any exotica outside this final device is unable to improve the sound. Save your money.
- Parasound got things right with the P5. The Optical and Coax inputs work well. USB input is reserved for disk mastering off my old Mac Mini and Parasound Z-Phono USB. This device has an ADC with line level and moving-mangent/moving-coil phono preamp. And it works as well as the P5 preamp and DAC. John Curl is a wizard!.
I really love the sound of this rig. If the album is well recorded and the mix is phase coherent, Brad Mehldau’s piano notes dance in space from string to string with a Brad and his Stienway are in the lounge sound.
References
References 1-4 are the step by step instructions I used. Reference 5 is Roon Labs talking about Roon.
- http://theaudiostandard.net/thread/2319/assemble-hifiberry-metal-case-digi#ixzz4AdN7yE8q
- https://www.raspberrypi.org/documentation/installation/installing-images/mac.md
- https://community.roonlabs.com/t/setting-up-a-raspberry-pi2-with-roonbridge-step-by-step-osx-version/9915
- https://community.roonlabs.com/t/howto-debian-installation-on-frenas-bhyve/10591
- https://roonlabs.com
What makes Roon Unique
Roon has three key subsystems
- Control
- Core
- Transport
The control component lets you play music. The Core maintains metadata about your external music library and serves the various transport devices. Transports deliver bit streams to a device for rendering.
Roon Business Model
Roon is unique in a couple of ways. First, it is designed to be embeddable in things. Roon Labs licenses the system to high end audio companies to incorporate in their music servers and music players. Highly regarded Bryston Audio builds components using the Roon software. Bryston are top shelf and lust-worthy things. Their version of what I describe here comes in a fancy case and has a touch screen control built in. And it is $1500 or so. When you buy one of these critters in includes a lifetime (of Roon and the device) right to use license. This is one way Roon Labs earns revenue.
The other way is that they license the system to individuals to run on home brew hardware like the system I am describing here. Roon offers the following licenses
- Two week trial
- Yearly paid yearly for about $120
- Lifetime paid once for about $500
The license entitles you to use the software and to use the Roon Labs metadata about the music and artists in your library.
Roon Subscription
The Roon Labs subscription includes both the use of the software and the use of their composer, artist, composition, and performance data. This seems like a small thing until you experience the difference. iTunes and Plex will find album jacket images, etc. iTunes will fetch Genius data so they can pitch music to you for purchase or to play in Radio. Roon Labs is not selling media but is very much into the Genius/Pandora “play music like this” thing.
Roon Radio
Roon Metadata includes composer profiles, performer profiles, and reviews of individual works. When you select an album or track to play, Roon gives you two options. Play the selected compositions or play the selected and continue on playing things like the root composition. Roon Radio works pretty well. It will play performances by the composer, performances by the artist, and performances by composers and artists that are similar to the selected work.
For example, I selected the first track from Thile-Meyer “Bass and Mandolin” and Roon worked its way through the album into Jaco Pastorius, Victor Wooten, Stanley Clarke, Chick Corea Electric Band, and back to Thile-Mehldau and Thile-Meyer. Poor dogs. I left it running while shopping and they had to listen to the acid-jazz and acid-folk.
Roon Software
My FreeNAS machine runs Roon Core. I use iPad Roon client to control the rig. Roon Transport runs on my Raspberry Pi, named Rasputin. Rasputin is a dateless-client of Roon Server and runs headless. SPDIF coax connects the Rasputin to my preamp.
Getting Started
For the trial, I installed Roon on my new iMac. This was as simple as downloading the image, starting Roon, and following the prompts as the startup wizard guided configuration. The configuration wizard asked about the location of my music library and if I wished to make iTunes playlists available. With that, it was ready to go. It also asked if it should configure the Apple TVs as playback endpoints. All discovery was automagical.
License
When I set up Roon core, it presented the three licensing options: trial, yearly, and life of the stuff. I elected to begin with a free trial. I set up my payment info and let Roon start a 1 year subscription.
Setting up the iPad
It was just as easy. Check out the App from the iPad App Store and launch it. The app starts, discovers the server, and discovers the endpoints. To get started is just that simple. You can begin browsing and playing things immediately.
Bells and whistles
Each Roon endpoint is associated with a space or zone. The zone has full FAT Channel manipulation capabilities with tunable high pass, band pass, and low pass filters to tailor the sound to the space. You can also adjust the delay and amount of buffering. The system is designed for synchronized playback in multiple zones simultaneously. I’ve not explored these capabilities. The only endpoints i use are on Trey, my new iMac and Lounge via Rasputin.
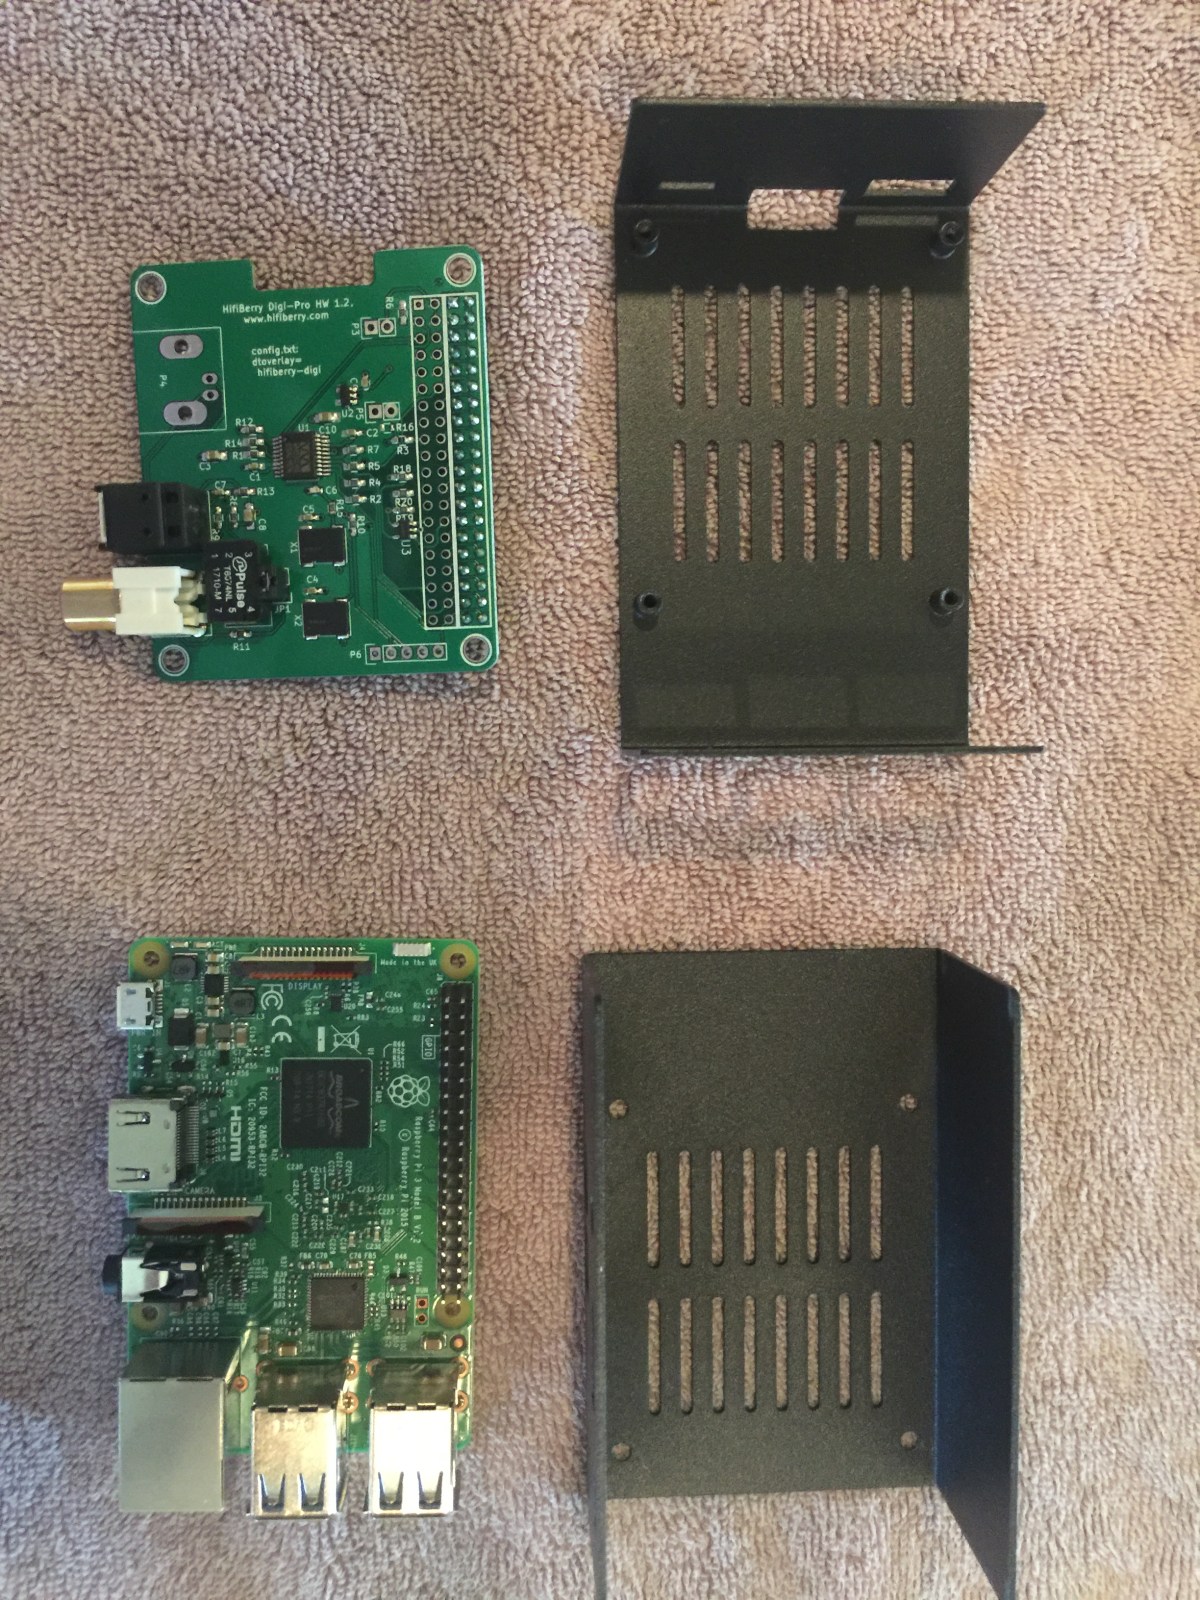
Building Rasputin
Kit
Rasputin is assembled from the following kit
- Raspberry Pi 3B
- HiFiBerry Digi+ interface
- HiFiBerry steel case
- HiFiBerry power supply
Assembly
Who would think it would be hard to put 4 bits together but it was. The Digi+ board hangs from the case top by the two long standoffs. The Raspberry Pi mounts to the case by the two short standoffs. Top and bottom go together. The long screws hold things together. Reference 1 describes this process.
Installing Raspbian
Raspberry Pi has a basic boot loader that reads an image from the micro SD card and starts it. This card must be properly prepared, ie
- FAT32 formatted
- SD image downloaded
- SD image unzipped
- SD image root directory contents but not the directory recursively copied to the SD card
Reference 1 describes several ways to make the SD card ready. I found it easiest to download, open in Finder, select the stuff in the root folder, copy, and paste to the SD card root. No 3rd party tools needed. Disk Utility and Finder work fine.
If this doesn’t go correctly, Raspberry Pi, she just sit there. Like Tar Baby. Without a clue. In case you forget, instructions are in a file in the root of the Raspbian release tree. I used Raspbian Lite which has a minimal kit for use with embedded systems like the Roon Transport.
Installing Roon Transport
Reference 3 describes the spells necessary for installing the transport on the Raspberry PI. It was easiest to log in on the console and do the customization described. Downloading the software installation script should use WGET rather than CURL. Make the script executable in /opt and run the script as described in Reference 3.
Installing Server on FreeNAS
Reference 4 describes installing the Server on FreeNAS. The instructions are straightforward to those used to working with FreeBSD and Linux. I’ll describe the things I did differently.
- Leave the server to configure networking using DHCP. mDNS services and client are set up by the Debian installer.
- Assign a host name. I picked Rocky from ROCK, and assigned the LOCAL domain.
- Install Roon as described and start it. BHYVE instructions worked well.
- All configuration happens in the Roon Control. It will find the new server. Select the new server and Roon will guide you through the configuration. This works well either on Roon on host or Roon Control app on an iPad.
- Point new server Roon at the media library. The Roon dialog is fussy about the spelling of the share name containing the media library. Type it as shown in the FreeNAS share configuration. Case matters.
- Follow the instructions to complete server configuration and give it some time to find your music and index it.
