
Introduction
Loyal readers remember that Sherman had lost his magic smoke, dying in his sleep with disk errors being logged. Dismal Wizard decided to replace Sherman with a TrueNAS Mini+ like the one already here. Still needing a machine to tinker on, he ordered a 45HomeLab HL4 purpose built for the role. The machine has arrived, is unboxed, disks loaded, and ready to go. A modern Merlin, he shot the works … and did something work? Read on to find out.
This post includes the following:
- Hardware first impressions
- First boot and related activities
- Filling the ZFS storage array
- Reclaiming Sherman’s disks for the new pool
- System software options and choices
- Application software we tried
- And our disk backup strategy
Revisions
- 2025-03-05 Original
References
- 45HomeLab HL4/8 User Manual
- 45Drives knowledge base for Rocky Linux Installation
- 45Drives Rocky Linux Repository Setup
- Rocky Linux ZFS Installation
- iXsystems TrueCommand Setup Guide
- Immich installation using Docker Compose
- FreeBSD ZFS Handbook ZFS Administration Guide
Hardware First Impressions
45Drives packaged the system adequately for shipping but not with, say Schiit Audio’s, more robust boxing and larger crush space. But the root volume was an SSD and no disks were in the drive bays to worry about. The package arrived in good order even with a trip through US customs. The only problem noted was that the power button had popped out of its hole.
The enclosure is seriously robust. 45HomeLab folk say it’s 16 gage steel. That’s some stout stuff. Over 15 pounds of it. Opening the enclosure is easy. And as enclosures go, this one is unique.
The front panel is piano-hinged and opens downward for access to the drive bays. The top and right side make up an L-shaped plate that is piano hinged at the bottom. This panel opens to the left to give access to the box interior.

Opening the front panel allows inspection and replacement of the drives. Opening the top/left side L-panel gives access to the motherboard for maintenance. The motherboard has only one slot for a single-width graphics card, storage host bus adapter, or network interface.
Inside is tidy with a small form factor power supply located above the drive enclosure. The drive cables are compact and in white spaghetti. Routing is pretty directly from the GigaByte Aorus B550i main board to the drive bay backplane. Everything is neatly dressed and laced.
The drives slide into the drive bay naked. There are no carriers to mess with. A spring clip at the top retains the drive. It is a snug fit to slip them in over the front panel fan. Once in and seated, they are in.
There are two fans, one on the Noctua low profile CPU cooler and a second pressurizing the drive bay.
The machine pulls about 100 VA but runs below skin temperature on the case. Exhaust air is cool.
HL4 is a keeper!
As home lab servers go, the 45HomeLab products are physically robust and easy to live with. The HL4 system is available as a formed, assembled, and painted shell plus drive bay backplane. Front panel options are steel and acrylic. And they’ll paint user supplied graphics as an option.
You can also add the power supply. As a small form factor supply is required, this is a wise choice.
Or you can let them add a system board, memory, and system storage plus RockyLinux or one of several other OS choices.
The system software is solid. It’s basically RedHat Linux, a production ready OS with curated software to provide a solid file server and application server environment. I’ve found some quirks regarding RDP/VNC but these are minor. RDP works for X11 XFCE sessions. The fancier stuff is still being sorted. Wayland is available and works well locally but headless Wayland is not quite born.
45HomeLab management environment is an extension of Cockpit that is 45HomeLab enclosure aware and ZFS aware (if you start with clean media — I didn’t). These tools are solid.
I’ve not tried Ansible nor Nix with the 45HomeLab base system. I’ve left application management to Portainer following 45HomeLab recommended practice. I’m aware of Ansible and Nix but have no experience with either. For me, leaving these rocks be is a sensible choice. For me, this machine is a production resource, not a training aid.
First Boot
This was the only surprise. The installed system image had a different initial password for the admin user (similar to Ubuntu and MacOS, the first user added is a sudoer). It wasn’t the super secret password mentioned in the manual. A character had been changed for whatever reasons.
A post to the 45Drives contact form resulted in an immediate call from Marketing and the answer to that question. I didn’t think to check the invoice for the updated password. Nobody ever checks the invoice and bill of ladding when material arrives in good order, do they? Anyway, I caught them before they left for the day!
The second surprise was that the boot magic keys were on the bottom of the display. Having iMacs, I don’t have a display so Telly has to stand in for a display when one is needed. And Telly overscans something fierce. Fortunately, GDM has a switch to compensate for TV overscan and it works. Now I can see the BIOS entry key and boot chooser key.
Those things set and the super-secret first user password changed, it was time to fill the drive bays and configure the big file system.
Filling the Z-Pool
The plan was to salvage the disks from Sherman who had lost his magic smoke. And the pool had errors on 2 disks, likely form the beginnings of the failure that made the magic smoke come out. I had 2 spares. So I ordered 2 like my spares (16TB mothers) for son of Sherman. Another order from TrueNAS.
So I put the 4 salvaged disks in from Sherman, booted up, and visited Cockpit to set up ZFS. The drives all showed errors. On the ZFS page for building a pool, there were error indicators but no way to see what was in error.
So it was time to get a shell out and give some shell commands using the nice one in Cockpit. It told me that my 4 drives were in use. Of course they were. Sherman was using them when he had his stroke. So drives belonged to an active pool.
But Sherman had 6 drives in the pool and Rocky had room for only 4. So I couldn’t recommission the original pool. So the disk were dirty and needed a bit of elbow grease.
Salvaging the Disks
I had planned to plug them in to a USB to SATA adapter (power from USB) only to discover that there was insufficient power to spin the drives. So I couldn’t erase them using MacOS DiskUtility. Time for plan B. DD from /dev/zero? Time for bed.
You’d think this would be well known and well documented as salvaging disks is common practice and many build their servers from used disks. Surprisingly, it is not. Most authors don’t know the ZFS commands to destroy ZFS pools or the Linux commands to scrub file system magic and partition tables from a device. dd from /dev/zero to coat the volume is not needed. Nor is using secure erase commands.
- Remove the partition table using parted(8)
- Remove the file system magic and volume descriptors using wipefs(8)
- zpool(8) create to write a new empty file system and volume descriptors on the members of the Z-pool. Houston UI attempts to automate this last step but isn’t quite there yet.
Real ZFS Removal Procedures
Some days later, I learned that some ZFS commands could help. The FreeBSD Handbook ZFS Administration Guide [7] outlines commands for creating and destroying ZFS pools, clearing the labels (label-clear). The wipefs(8) command can be used to clear filesystem descriptive magic from the disks. parted(8) can be used to zero the partition tables.
I applied the various charms. Much to my surprise, Houston UI could now see the disks. The in-use warnings were clear. Houston UI could put them in a pool for me. Then it all vanished. But zpool status showed a happy pool where it should be. Houston UI is very much a work in progress.
System Software
45Drives maintains a Rocky Linux repository set for software installation on its products. If you buy a preconfigured system, the repositories will already be configured. My system arrived with Rocky Linux 8 installed in a server. plus desktop configuration with XFCE and Gnome desktops installed. The X11 and Wayland windowing systems were installed. And the graphical login screen was installed. Here, you can pick the windowing system and desktop to be used for a session as a login option.
System specific User Manual.
HL4 and HL8 share a manual as they differ in the number of disk bays in the package. The manual covers cabling, adding disks, first boot procedures, storage array configuration, and advanced stuff like bonding interfaces in HL8. The system starts and runs as received. You may need to add additional desktop tools.
Rocky Linux Version
Rocky Linux 8 or 9. — Rocky Linux 8 is 45Drives current baseline installation. XFS has withstood the test of time. See [2] and [3] for the repository location and installation work flow. It’s not a step by step so some experience with Linux installations is needed.
Storage Array File System
It’s OpenZFS. ZFS had its start at Sun Microsystems. When Oracle acquired Sun, ZFS and fast database hardware were Oracle’s desires. Oracle continued ZFS development but eventually offered it open source.
The open source project went through a number of configuration changes but today is OpenZFS with a permissive license not quite to the liking of Free Software Foundation. But sufficiently free that it can be included as a loadable kernel module. Debian now offers ZFS as a root filesystem option. See [4] for ZFS installation procedures. See [7] for ZFS pool and dataset administration procedures.
Display, X11 or Wayland
Wayland has been a long time coming. It is now mature and has evolved to the point where modern applications work well with it. Gnome now uses Wayland as their display server of choice. Gnome includes Remote Desktop Protocol replacing X11 for remote display service. RDP works quite well. I’m using Jump on MacOS and iPadOS for remote desktop access.
To the Cockpit
45Drives has expanded Cockpit to support 45Drives and 45HomeLab hardware and the ZFS file system. They call their expanded version of Cockpit Houston UI. The extensions are all implemented as Cockpit add-in modules. Houston UI ZFS pages are still a work in progress. They’ll get it eventually.
Yes, We’ve got containers
Portainer and Docker — 45Drives includes Portainer and Docker for containerizing applications. The HL4/8 manual contains configuration for several popular home server applications including NextCloud, Plex Media Server, Immich, and others. The procedures in the manual are solid. The Plex Media Server example is a good model for installing other web served applications.
I tried containers twice, once using Docker plus Portainer and the second using Podman plus Portainer following the procedures in the Portainer documentation. Either works well but the Podman is a bit lighter weight at run time. No persistent daemon is needed with Podman reducing its attack surface somewhat.
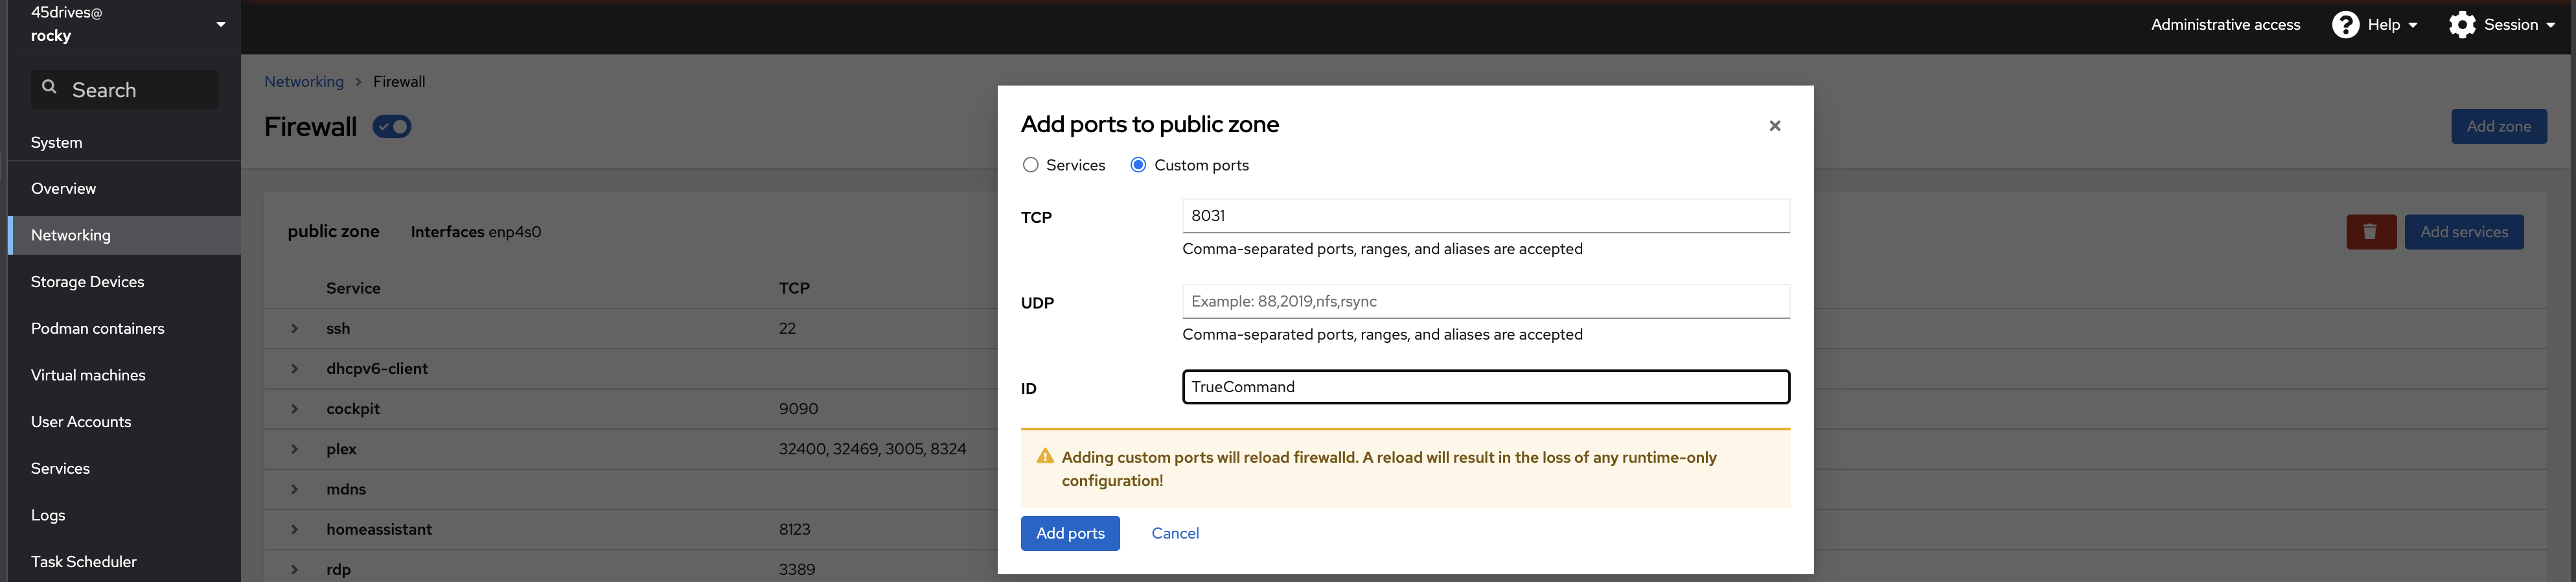
One thing to watch is management of port mappings. Podman uses an un-routed network (RFC 1918) for internal networks. Configuration data lets the user map specific internal ports to user ports. I make note of these in two places, my ProtonPass password manager and in the host Firewall Cockpit page of open ports.
Your desktop awaits, Mr. Bond
Pick your poison. The login manager lets you choose. And choose the display server as noted above.
Application Software
So far, I have tried the following software. Some remarks about each.
- Plex Media Server
- iXsystems TrueNAS True Command
- Immich
- xfsdump to back up root to the ZFS pool or to an external USB disk.
Plex Media Server
45HomeLab’s HL4/8 manual provides a complete procedure for installing Plex Media Server. Apparently, Docker will let you specify the UID and GID of the service in the container spec. There’s no need to add daemon users.
Plex works with HDHomeRun tuners. It supposedly knows how to find them but I’m not having any joy. I parked my tuner at a fixed address in UniFi Network and enter that address when configuring Live TV. I’ve found it important to disable the junk channels to keep TV navigation uncluttered. Once mapped, the Live TV works well.
I found I had to create the library directories in the storage array before configuring them in Plex. I also had to map the storage into the container in Portainer. I used bind to put them at a fixed location in the ZFS file system. If you let Portainer create containers, it will put them on the system disk.
TrueCommand
TrueCommand is iXsystems management console for a fleet of two TrueNAS servers. I have 2 here at home, a primary and a backup, both iXsystems TrueNAS Mini+ (5 bays) systems. These are SuperMicro IoT edge server devices configured to iXsystems specs for deployment as TrueNAS systems. They’re a bit pricy but robust.
TrueCommand installs easily by merging iXsystem’s TrueCommand deployment procedure with the 45HomeLab Plex Media Server deployment.
Note that TrueCommand licensing is based on drive count. Below a threshold, no paid license and key are needed. This threshold will accommodate home lab and small office deployments.
If everything is within the lifelines (TrueNAS hosts and TrueCommand host), TLS connections and login can be used for TrueCommand to communicate with the servers. There’s no need to set up a virtual private network for this use case.
Home Assistant
The HL4/8 manual gives an installation procedure for running HomeAssistant in a container. HomeAssistant is of interest because the second installation method shows how to run a container using Docker Compose to launch it from the shell rather than from Portainer.
I gave HomeAssistant a try using method 1 and found I had trouble finding layout modules and cards. I returned to the Raspberry Pi cobbler methods that HomeAssitant fully supports.
Immich
Immich is a photo manager in the manner of Apple Photos developed as an open source software project. Immich grew out of frustration with the photo services bundled with the two major mobile phone environments. The authors desired to keep everything within the lifelines.
Immich has a client server architecture. Each user machine (phone or host) having photos runs a copy of the Immich application. A server running the Immich container running on your server maintains copies of the current version of each image. That’s its job, to keep a safe copy away from acts of Apple or Google. Lets refer to this process gaggle as the Immich store.
Immich does not keep the original and edits. It’s not possible to pull a copy of the original unedited camera raw or camera HEIC file from immich. There is no way to revert edits. And Immich editor is pretty basic.
Once installed, Immich appears to be pretty fuss-free. Immich does not run as a service on phones. Rather, you shoot pictures then start Immich to push the new images up to your Immich store.
In my case, I have use iCloud photo library enabled with keep originals on my iMac enabled. It makes sense to run Immich on my iMac and not on the phone or the iPad. Phones and tablets generally have a space-optimized version of the edited images on them.
I’ve not yet looked into how Immich treats photos that have been pushed to each phone or tablet in the gaggle. I suspect it looks at some metadata that identifies the common ancestor to avoid duplicates.
Immich installs pretty easily in Portainer by following the instructions in the 45Drives HL4/8 manual. Don’t copy and paste the compose file from the manual. Rather, take the links to github, download the compose file and environment file, and put them into the stack following the setup workflow from 45drives. The app will come right up.
There are a couple of choices, where to put the media and the postgress database. I elected to put both into the Zpool. My local Zpool has directories for Backups, Containers, Replications, Users, and Virtual Machines.
Disk Backup Strategy
There are two areas and two volumes to back up, the ZFS Pool, / (root), and /home (Linux for MacOS /Users).
XFS Backup Strategy
I’ve used xfsdump(8) to back up the root partition.
- -l 0 is the dump level. The first one is always level zero.
- -f is the path of the output file, here in the ZFS pool. The program expects the output path to exist
- and / is the root node of the filesystem limb to be backed up.
xfsdump is modeled after BSD dump and restore. On this hardware, xfsdump was fast. It saved the root position in less time than it took to complete the dialog, about 105 seconds.
Two is one and one is none. That’s the old saying. I’ll replicate this to Sherman so the backup media has a backup.
And Raid is robustness, not a backup.
[45drives@rocky ~]$ sudo xfsdump -l 0 -f /HomeLab/Backups/Rocky/Root/2025-03-05-root-l0.xfsdump /
xfsdump: using file dump (drive_simple) strategy
xfsdump: version 3.1.8 (dump format 3.0) – type ^C for status and control============================= dump label dialog ==============================
please enter label for this dump session (timeout in 300 sec)
-> 2025-03-05 / level 0
session label entered: “2025-03-05 / level 0”——————————— end dialog ———————————
xfsdump: level 0 dump of rocky:/
xfsdump: dump date: Wed Mar 5 14:10:45 2025
xfsdump: session id: 981132dd-aa65-4988-a398-2570fdc78049
xfsdump: session label: “2025-03-05 / level 0”
xfsdump: ino map phase 1: constructing initial dump list
xfsdump: ino map phase 2: skipping (no pruning necessary)
xfsdump: ino map phase 3: skipping (only one dump stream)
xfsdump: ino map construction complete
xfsdump: estimated dump size: 21685330880 bytes============================= media label dialog =============================
please enter label for media in drive 0 (timeout in 300 sec)
-> 20225-03-05 root level 0
media label entered: “20225-03-05 root level 0”——————————— end dialog ———————————
xfsdump: creating dump session media file 0 (media 0, file 0)
xfsdump: dumping ino map
xfsdump: dumping directories
xfsdump: dumping non-directory files
xfsdump: ending media file
xfsdump: media file size 21063088192 bytes
xfsdump: dump size (non-dir files) : 20721248472 bytes
xfsdump: dump complete: 107 seconds elapsed
xfsdump: Dump Summary:
xfsdump: stream 0 /HomeLab/Backups/Rocky/Root/2025-03-05-root-l0.xfsdump OK (success)
xfsdump: Dump Status: SUCCESS
[45drives@rocky ~]$
ZFS Backup Strategy
ZFS Snapshot and ZFS replication provide an efficient means to back up ZFS pools. The way of things is to create a snapshot. Then the replication command sends the snapshot to a pool in another dataset on another host or to local media. When sending to local media, the destination directory and file must exist. Touch it before sending. The FreeBSD ZFS guide [7] shows how to do this.
Houston UI Can’t Replicate
Houston UI is still growing. As with the TrueNAS web management, it will take some years to become feature complete. The current release in RockyLinux 8 has no tools to create and manage snapshots or to create and manage replications. These things may be done the FreeBSD way at the terminal until 45Drives has these available.
A review of 45Drives GitHub site shows that Houston UI is common to all Rocky Linux versions under active maintenance.

You must be logged in to post a comment.